A grout pen lays coloured coating over the surface of existing grout. That is the whole of what it does. It is a cosmetic colorant, not a repair, and every disappointing result with one comes from expecting the second thing.
Which means the useful work happens before you buy it.
Is your grout dirty, or is it failing?
Run a fingernail firmly along a joint at several points, and press.
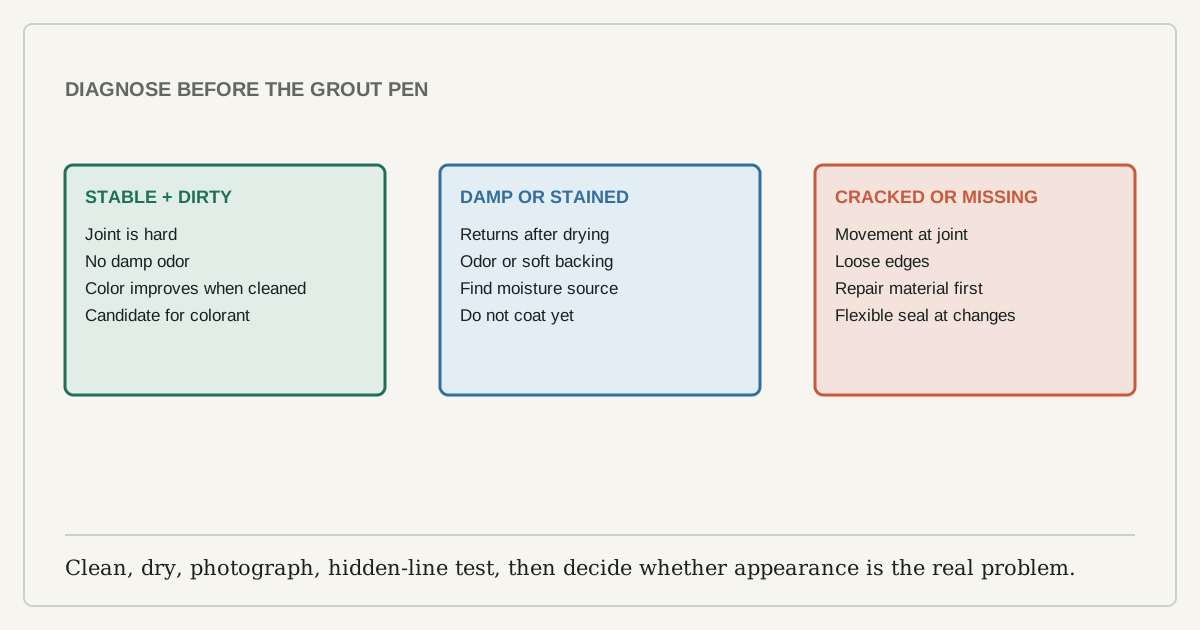
Sound grout that is merely discoloured stays hard, stays put, and looks bad. Failing grout gives itself away immediately: it powders under the nail, it is cracked, it is missing in patches, or it moves. Colour over a failing joint and you have a coloured failing joint — the coating has no structural role and cannot restore what is underneath.
There is a specific case people get wrong constantly. At a change of plane — wall to floor, wall to wall, around a bath — a rigid grout joint is the wrong material in the first place. The Tile Council of North America's guidance puts a flexible movement joint there, because the two surfaces move independently. Cracked grout in a corner is not damage; it is grout doing what rigid material does in a place that needed sealant. Recolouring it hides a joint that should be raked out and replaced.
First, the moisture question
Do this before the cleaning, not after, because it can end the project.
Recurring dark staining that comes back after cleaning. Soft or spongy material. Paint bubbling on an adjacent wall. A musty smell in the room. Any of those points at water getting somewhere it should not, and the EPA is direct about the sequence: fix the moisture problem first, because nothing else holds.
Their instruction is worth quoting in spirit — do not paint or caulk over a moldy surface, because paint applied over mold is likely to peel. A grout pen is paint by another name. Dead mold still causes reactions, so killing it is not sufficient either; it has to be removed.
Their rough DIY threshold is about ten square feet, roughly a three-foot square. A grout line in a shower that keeps going black is usually well under that and usually about ventilation and drying rather than about the grout. Run the fan, leave the door open, wipe the walls down, and see whether the problem was ever cosmetic.
The prep that makes the colour last
Colorants bond to a clean, dry, residue-free surface, and every failure mode traces back to one of those three words.
- Degrease first in a kitchen or around a sink. Cooking film and soap scum are invisible bond-breakers; a mild degreaser or a baking-soda paste lifts them.
- Scrub the joint, not the tile, with a stiff nylon brush — an old toothbrush for detail — and a neutral cleaner. Acidic cleaners can etch and leave a residue that fights the pen.
- Rinse twice with clean water so no cleaner film remains.
- Dry completely, on the label's timing rather than on appearance. A joint holds water long after the tile face looks dry.
A hidden line first, always
Grout pens differ enormously in tip control, and the colour you imagined is not reliably the colour that dries.
Run the pen along a short, invisible joint — behind the toilet, under an appliance toe-kick, in a closet doorway — and let it cure fully before committing to a room. You are testing two things at once: whether the dried colour reads the way you expected against your tile, and whether your hand can keep the material in the channel without smearing it across the face.
Wipe strays off the tile promptly, and be careful about which tile you are wiping. Pigment that lifts cleanly off glazed ceramic can stain unsealed stone.
Not every marker-shaped product suits your joint
The word "pen" describes a shape, not a chemistry.
Some colorants are approved only for cementitious grout; others explicitly cover cement, epoxy, urethane and acrylic. Some include a sealer and forbid a separate one over the top; others expect you to seal afterwards. The manufacturer's data sheet decides all of this, and it is the only document in this project that is actually authoritative.
| What you have | Is the pen the right tool? | What to do instead |
|---|---|---|
| Hard, intact joints, uneven colour | Yes — good candidate | Clean, dry, test a hidden line |
| Cracked or missing grout in the field | No | Find out why it failed before refilling |
| Cracked grout in a corner or plane change | No | Rake out, replace with flexible sealant |
| Staining that returns, or a musty smell | No | Find the water; colour will not hold |
| Epoxy, urethane, or sealed grout | Unknown | The data sheet is the only answer |
Photograph the stages
Take a picture before cleaning, after the joints dry, and after the colorant has cured — same spot, same light, no flash.
This sounds fussy and it is the thing that most improves the result, because it shows you patchy coverage and residue in ordinary room light while the mistake is still one metre square. Keep the colour name and batch with the photos; similar whites become impossible to match from memory six months later when one line needs touching up.
Work in sections with a clean stopping point. Then leave it dry for as long as the label says, which in a bathroom usually means nobody showers that night.
A grout pen used on sound, clean, dry joints is a genuinely good three-hour improvement to a tired room. Used on anything else, it is an expensive way to postpone finding out what is actually wrong — the same trap as tiling over a surface that was never going to hold it.