Peel-and-stick tile can give a renter a useful visual change without mortar, but "peel-and-stick" does not automatically mean damage-free removal. Some backsplash products are intentionally made with stronger adhesive and warn that paint may lift during removal. The sound decision is product-specific: compare the manufacturer's surface list with your wall, your lease, and your tolerance for repainting.
Where the adhesive fails
Pressure-sensitive adhesive dislikes five things. Learn them and you'll predict most failures:
- Heat. Directly beside or behind a range or oven, the adhesive softens and edges lift. Keep it out of the immediate cooktop zone unless the product is explicitly rated for heat.
- Grease and soap film. A backsplash coated in invisible cooking film or bathroom soap scum won't bond. This is a cleaning problem masquerading as an adhesive problem.
- Moisture and standing water. Splash zones, shower surrounds, and anywhere water pools will creep under seams over time.
- Texture. Adhesive needs a smooth, sound surface. Heavily textured walls, unsealed masonry, and existing tile grout lines leave the backing bridging gaps it can't grab.
- Fresh or chalky paint. Wait for the paint manufacturer's full cure period. If the existing coating powders onto a clean cloth, the adhesive may bond to weak paint rather than to a sound wall.
A small-area test is evidence, not a guarantee
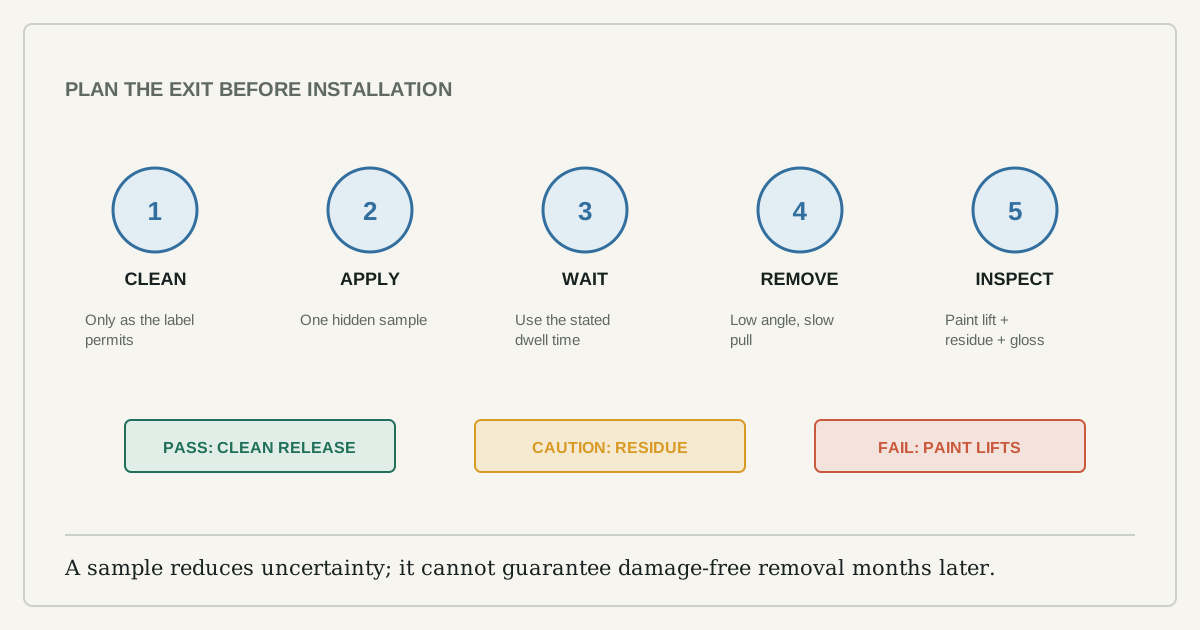
Never commit a whole wall on faith. First read the exact product instructions; one manufacturer may require acclimation, another a particular cleaner, and another may exclude the surface entirely. Clean and dry an inconspicuous patch as directed, apply one sample piece, and leave it through normal room use. A stable sample makes the surface a better candidate, but it cannot promise damage-free removal months later. If an edge curls, paint lifts, or residue appears during the sample removal, stop.
Remove it clean
Reversibility is the whole point for renters, so plan removal before installation:
- Warm the adhesive first — a hair dryer on low along an edge softens the bond so tiles peel instead of tearing the surface.
- Pull slowly at a low angle, back toward itself, not straight out.
- Remove leftover adhesive with an adhesive remover the wall finish can tolerate (test it first), then clean.
- Expect to touch up paint afterward regardless; keep a little matching paint on hand.
Layout and cutting so it looks intentional
A reversible install still has to look deliberate, and that's about layout, not adhesive. Don't start in a corner — corners are rarely square, and a crooked first row telegraphs up the whole wall. Pencil or snap a level, plumb reference line near the center and work outward, so any out-of-square is split to the edges where it's least visible. Dry-lay a row first to plan where cut tiles land and to avoid a thin sliver at a visible end. For outlets and switches, make a paper template, trace it onto the tile backing, and cut with a sharp utility knife against a straight edge — score and snap rather than sawing, and change the blade often. Stagger seams like real tile if the pattern allows, and press every tile firmly from the center outward to chase air from under the backing.
If the layout reaches a receptacle or switch plate, do not cut around energized hardware. Turn off the correct circuit at the breaker and verify the device is de-energized before removing a cover; if you cannot do that confidently, stop the tile at a safe boundary or use an electrician. The finish material must not interfere with the device, box, or cover seating.
Surface and location decision matrix
| Proposed location | Main question | Safer decision |
|---|---|---|
| Smooth, fully cured painted wall | Does the product list painted drywall? | Test one piece and accept possible touch-up |
| Textured plaster or brick | Can the backing make full contact? | Usually choose a freestanding panel instead |
| Directly behind a cooktop | Is the product rated for that heat and clearance? | Follow appliance and tile limits; otherwise do not install |
| Shower wall or standing-water zone | Is it explicitly approved as a wet-area system? | Decorative backsplash tile is not a waterproof assembly |
| Existing tile with deep grout lines | Will seams bridge low spots? | Use only a manufacturer-approved leveling method |
| Rental wall with fragile paint | Who pays if paint releases? | Get written permission or skip adhesive |
Plan the exit before installation
Keep one unused tile, the product label, the lot number, and the removal instructions together. Photograph the wall before installation, including existing chips or stains, and record any written landlord approval. When it is time to remove the material, follow the manufacturer's direction rather than assuming heat is safe; heat can soften some adhesives but can also damage finishes or vinyl products. Work slowly on one corner and stop if the wall coating separates.
The reversible-vs-permanent line
Ask one question before you start: if the paint comes off with the tile, is that repair acceptable under the lease? Smooth, cured, dry walls are better candidates, but reversibility still depends on the product and coating. On fresh paint, textured plaster, an unapproved heat or wet zone, or a wall the landlord will not allow you to repair, choose a freestanding or mechanically supported panel instead. The honest renter promise is not "no damage"; it is a tested surface, documented permission, and a removal plan.