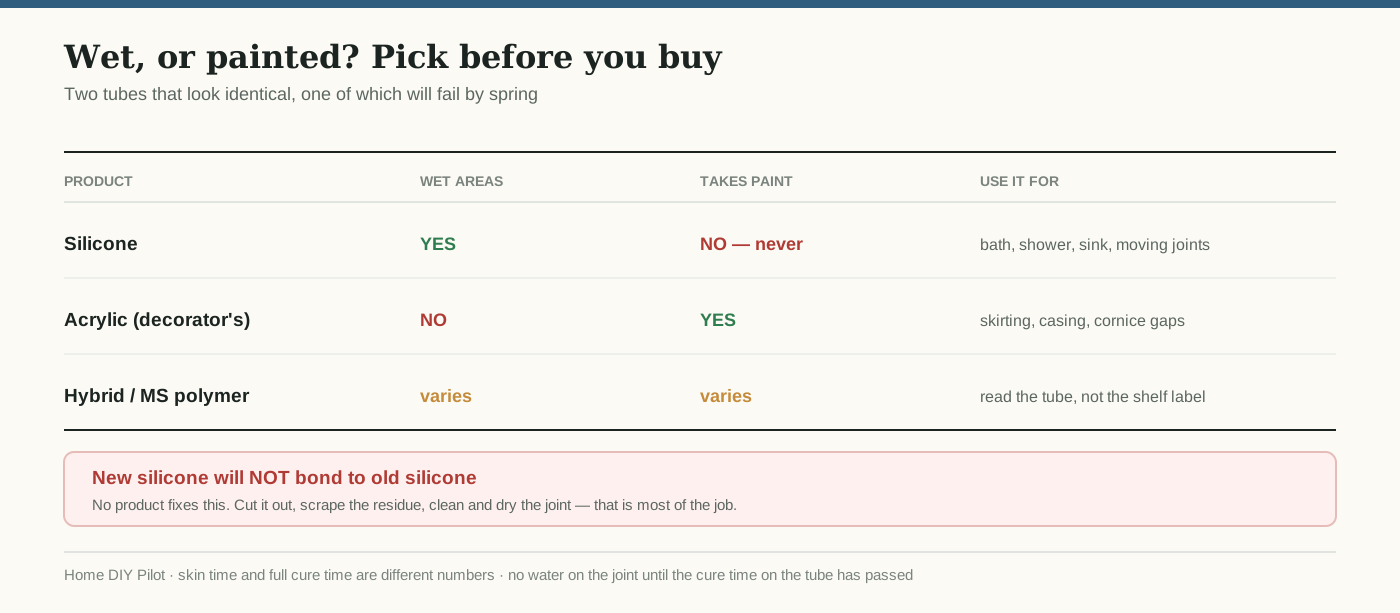
Two tubes, similar price, similar-looking bead. One of them will still be intact in five years and one will be black and peeling by spring.
The choice is not really about brand. It is about matching chemistry to the job, and about one rule that almost everyone breaks.
What each one is for
Silicone is flexible, genuinely waterproof, and stays that way. It is the right answer around baths, shower trays, sinks and any joint that gets wet or moves. Its defining limitation is that paint will not stick to it. Not badly — at all. If a joint needs painting, silicone has disqualified itself before you start.
Acrylic, often sold as painter's or decorator's caulk, is the opposite trade-off. It takes paint beautifully, which makes it the correct filler for the gap between skirting and wall, around door casing, and at cornice. It also shrinks slightly, tolerates movement poorly, and does not belong anywhere persistently wet.
Hybrid sealants — siliconised acrylics and MS polymer products — sit between the two, and the marketing on them is louder than the performance difference. Some genuinely take paint and tolerate damp. Read the tube rather than the shelf label, because "for bathrooms" and "paintable" appearing on the same product is a claim worth checking against the technical data.
The failure this prevents is the classic one: painter's caulk run around a shower tray because it was the tube already open. It absorbs, it shrinks away from the joint, water gets behind it, and now the problem is not the sealant.
The rule people break
New silicone will not bond to old silicone.
It looks like it has. It skins over, it feels solid, and it peels off in a rubbery strip a few weeks later, usually taking the illusion of a seal with it.
There is no product that fixes this and no surface preparation that works around it. The old bead has to come out completely — cut both edges with a sharp blade, pull the bead away, then scrape and clean the residue from the substrate. Silicone remover softens what is left, and the joint must then be genuinely clean and genuinely dry before anything new goes in.
This step is most of the job. If you are not prepared to do it, the honest options are to leave the existing seal alone or to accept that you are buying a few weeks.
Skin time is not cure time
Tubes state two different numbers and people act on the wrong one.
Skin time is how long until the surface is touch-dry — often quite short. Full cure is when the sealant has developed its properties through the depth of the bead, and for silicone this is typically much longer, and slower again in a cold or poorly ventilated room.
The practical consequence: do not use the shower during the cure period stated on the tube, however dry the surface feels. Water on a partially cured bead is how a correctly chosen, correctly applied sealant still fails.
In bathrooms specifically
Choose a sanitary-grade silicone containing a fungicide. It is not a licence to skip ventilation, but it meaningfully delays the point at which a bead goes black.
And be clear about what black silicone means. Surface mould on the bead wipes off. Mould that has grown within the sealant does not — no cleaner recovers it, and repeated bleaching just degrades the surface while leaving the colonisation intact. That bead is finished; replace it.
If beads keep failing in the same place within months, the sealant is not the problem. Persistent moisture is, and the questions worth asking are about extraction, drying time between uses, and whether water is tracking behind the tiles rather than sitting on them.
Where the joint moves, and why that decides the product
The reason silicone dominates wet areas is not only water — it is movement.
A bath flexes measurably between empty and full of water and a person. A shower tray moves. Timber-framed floors move seasonally. A joint at a change of plane, where two surfaces meet at an angle, absorbs that movement, and a rigid filler cracks the first time it happens. This is why grout at an internal corner fails repeatedly while grout on the flat is fine: the corner is a movement joint, and it wanted a flexible sealant rather than grout.
Fill the bath before you seal it if the tub will be used full. The joint sets at the loaded position, and the sealant then works in compression as the bath empties rather than being pulled apart every time it fills.
Applying it so it lasts
Cut the nozzle small and at an angle — a fat bead is not a stronger bead, it is just harder to tool and more likely to trap air. Run it in one continuous movement rather than in nervous segments, because every stop and start is a potential void.
Tool the bead promptly, before it skins, with a shaped tool or a wet finger, pressing it into the joint rather than merely smoothing the top. The point of tooling is contact with both faces.
Then leave it entirely alone for the full cure period. The most common last mistake is going back to tidy one section an hour later, which breaks the skin on a bead that was setting correctly.