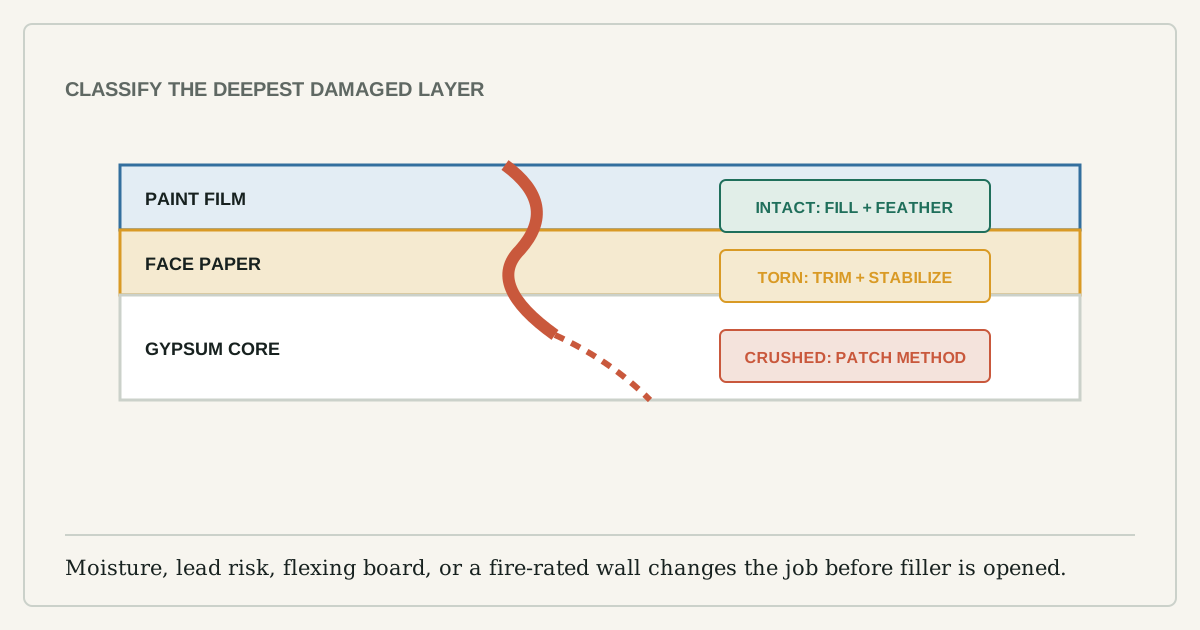
A shallow dent with intact paint is a filling job. A dent with brown or fuzzy paper exposed is a surface-stability job first. A soft patch below a window or pipe may be a moisture problem. Treating all three with a thick scoop of filler creates bubbles, a visible hump, or a repair that fails again.
Before sanding, scraping, or cutting any painted wall, consider the building age and local lead rules. EPA warns that disturbing painted surfaces in pre-1978 housing can create hazardous lead dust. Renters should report the damage and follow the lease; anyone uncertain about lead, asbestos, moisture, or a fire-rated assembly should stop before making dust.
Classify the damage with light and touch
Shine a lamp across the wall, not straight at it. Raking light reveals the raised rim around an impact. Press gently around the area with one fingertip.
| What you find | Likely repair class |
|---|---|
| Firm board, intact paint, shallow depression | Thin fill and feather |
| Loose paint edge or fuzzy face paper | Stabilize loose material, then skim |
| Hole, crushed gypsum, or flexing board | Patch method, not dent filler |
| Softness, staining, odor, or recurring damage | Find the moisture or movement source first |
| Wall separating occupancies or marked fire-rated | Confirm an approved repair method |
Circle the real edge lightly with pencil. The visible dent may be smaller than the raised perimeter that must be feathered.
Deal with loose face paper once
USG's repair guidance says to remove loose face paper before applying compound. That does not mean peeling every layer that can be lifted. Use a sharp knife to trim only paper that is already detached, cutting back to a firm edge. Pulling a loose flap can delaminate a much larger area.
Vacuum dust with a soft nozzle. If the exposed paper remains fuzzy or bubbles when damp compound touches it, use a problem-surface sealer explicitly approved for torn drywall and follow its ventilation, temperature, drying, and topcoat instructions. Do not improvise with glue, hairspray, or an unknown solvent.
Build the repair in thin geometry
Use a clean putty knife wider than the dent. Press the first coat across the depression, scrape off the surplus, and leave the center filled without building a thick rim. Let it dry fully according to the product and room conditions.
For the second coat, use a wider knife and extend the edge beyond the first coat. Hold the blade at a shallow angle so the compound tapers to almost nothing. The aim is a broad, low transition. A small patch becomes visible when its edge is steep, not because it is broad.
Do not keep smoothing compound after it begins to set. Dragging half-dry material pulls it into ridges that need extra sanding.
Sand by shadow, not by fingertip alone
Once dry, place the lamp at the same low angle used for diagnosis. Sand only the ridges and knife lines with fine abrasive. Keep the sanding block flat; a fingertip behind folded paper digs a hollow in the soft center.
Wipe or vacuum the dust, then move the lamp to the opposite side. A patch can feel smooth while still casting a crescent shadow. If the center is low, add another thin coat. If the edge is high, feather it rather than enlarging the hollow.
Wet sanding can reduce airborne dust for compatible compounds, but follow the product guidance and avoid soaking the drywall face paper. Do not wet-sand where lead or other hazardous coatings are a concern.
Primer is part of the repair
Joint compound and drywall paper absorb paint differently. USG's primer guidance exists to equalize porosity and surface texture; without primer, the patch can flash as a dull or shiny island even when the color matches.
Prime the repaired area and a small feathered margin with a drywall-compatible primer. Let it dry, inspect again in raking light, and only then apply the finish paint. Match the old application texture: a small roller on a rolled wall, or a fine brush on brushed trim. A perfectly smooth patch under a stippled wall paint can remain visible.
Decide where the paint should stop
Fresh paint rarely disappears in the middle of an aged wall. If the patch is in strong side light, use a natural break such as a corner, door casing, or ceiling line. Test the stored paint on a card and let it dry before trusting the wet color. Old paint may have changed; the wall certainly has.
When a dent is no longer a cosmetic repair
Stop if the board is soft, the dent returns under light pressure, the crack continues to grow, staining reappears, the patch is near an electrical fitting with unknown damage, or the wall may be fire-rated. A cosmetic repair should not hide a leak, structural movement, or required assembly. For those cases, document the damage and use the landlord, building manager, or qualified trade.